e hënë, 25 qershor 2007

CSS Borders, CSS Margins and CSS Paddings

CSS Borders

The CSS border property is used to set borders of an element

You can specify the border for all sides using this syntax:

border: width style color;

border: 1px solid red;

other border properties:
border-top
border-top-width
border-top-style
border-top-color

border-bottom
border-bottom-width
border-bottom-style
border-bottom-color

border-right
border-right-width
border-right-style
border-right-color

border-left
border-left-width
border-left-style

border-left-color

border-width values:
thin
medium
thick
length

border-style values:
dashed
dotted
double
groove
hidden
inset
none
outset
ridge
solid

border-color values:
color name
hexadecimal
RGB

Below is an example of a css border style for all sides.

<p style="border: 3px dotted #990000; width: 300px;">
This paragraph is wrapped with a 3px border-width, in dotted border-style and with a hex color of #990000.
</p>

Output:


You may set borders individually by using the border-left, border-right, border-top and border-bottom properties with the same values as the border property.

<p style="border-bottom: 2px solid #990000; width: 300px;">
This paragraph has a 2px bottom border, in a solid border-style and with a hex color of #990000.
</p>

Output:


CSS Margins


The CSS margin property sets the gap or space around an element.

You can specify the margin for all sides of an element using the syntax below:

margin: top, right, bottom, left;
margin: 5px, 5px, 5px, 5px;

You may also set the margins individually using the following margin properties:
margin-left
margin-right
margin-top
margin-bottom

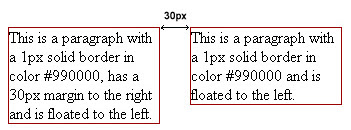
Below, we have two paragraphs floated to the right and setting a 30px margin to the right of the first paragraph.

<p style="border: 1px solid #990000; width: 150px; margin-right: 30px; float:left;">
This is a paragraph with a 1px solid border in color #990000, has a 30px margin to the right and is floated to the left.
</p>

<p style="border: 1px solid #990000; width: 150px; float:left;">
This is a paragraph with a 1px solid border in color #990000 and is floated to the left.
</p>

Output:


CSS Paddings

The CSS padding property define the space between the element border and the content within it.

You can specify the padding for all sides of an element using the syntax below:

padding:
top, right, bottom, left;

padding: 10px 10px 10px 10px;

You may also set the margins individually using the following margin properties:
padding-left
padding-right
padding-top
padding-bottom

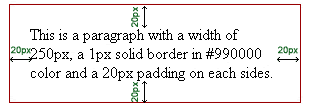
Below is an example of paragraph having a 20px padding on all sides.

<p style="width: 250px; border: 1px solid #990000; padding: 20px 20px 20px 20px;">
This is a paragraph with a width of 250px, a 1px solid border in #990000 color and a 20px padding on each sides.
</p>

Output:


Below is an example of a paragraph with a left padding of 30px.

<p style="border: 1px solid #990000; width: 250px; padding-left: 30px;">
This is a paragraph with a width of 250px, a 1px solid border in #990000 color and a 30px padding on the left..
</p>

Output:

e diel, 24 qershor 2007

CSS Fonts and Texts

font
You can define the font-style, font-weight, font-variant, font-size and font-family all at once.

Value: font-style, font-weight, font-variant, font-size and font-family

<p style="font: italic bold 20px Verdana;">Sample Text</p>

Output:


font-family
You can choose which font family to use. You can put other font-family alternatives just in case the first font-family is not available in the user’s system. In our example below, if Arial is not available in the user’s system fonts, then it will use Helvetica . You can use many other generic fonts. They will be prioritized according to their order.

Value: font name

<p style="font-family: Arial, Helvetica">Sample Text</p>

Output:


font-size
used for setting the size of the font

Possible Values:
xx-small
x-small
small
medium
large
x-large
xx-large
smaller
larger
length
percentage

<p style="font-size: large;">Sample Text</p>

Output:


font-style
Used for setting the style of the font

Value: normal, italic, oblique

<p style="font-style: italic;">Sample Text</p>

Output:


font-variant
Used for setting fonts to small caps or in normal format

Possible Values: normal, small-caps

<p style="font-variant: small-caps;">Sample Text</p>

Output:


font-weight
Used for setting the weight of the font

Possible Values:
normal
bold
bolder
lighter
100
200
300
400
500
600
700
800
900

<p style="font-weight: bold;">Sample Text</p>

Output:


color
Used for setting the color of a text. The color value may be a color name: (blue, red, etc.), a hexadecimal number:(#ff00ff, #333443) or an RGB color: (rgb(255,255,000), rgb 122,234,123).

Value: color

<p style="color: red;">Sample Text</p>

Output:


direction
Used for setting the text direction

Possible Values: ltr, rtl

ltr (left to right) default
rtl (right to left)

<p style="direction: rtl;">Sample Text Sample Text2 Sample Text3</p>

Output:


line-height

Used for setting the spacing between lines.

Possible Values:
normal
number
length
percentage

<p style="line-height: 30px;">
Sample Paragraph Sample Paragraph Sample Paragraph Sample Paragraph Sample Paragraph Sample Paragraph Sample Paragraph Sample Paragraph Sample Paragraph Sample Paragraph Sample Paragraph Sample Paragraph
</p>

Output:


letter-spacing

Used for adjusting the space between letters

Possible Values: normal, length

<p style="letter-spacing: 5px;">Sample Text</p>

Output:


text-align

Used for setting the text alignment

Possible Values:
left
right
center
justify

<p style="text-align: center;">
Sample Paragraph Sample Paragraph
Sample Paragraph Sample Paragraph Sample Paragraph
</p>
<p style="text-align: justify;">
Sample Paragraph Sample Paragraph
</p>
<p style="text-align: left;">
Sample Paragraph Sample Paragraph
</p>
<p style="text-align: right;">
Sample Paragraph Sample Paragraph
</p>

Output:


text-decoration

Used for adding decoration to texts

Possible Values:
none
underline
overline
line-through
blink

<p style="text-decoration: line-through;">Sample Text</p>

Output:


text-indent
Used for indenting the first line of a text

Possible Values: length, percentage

<p style="text-indent: 20px;">
Sample Paragraph Sample Paragraph
</p>
Output:


text-transform

Used for controlling text display

Possible Values:
none
capitalize
uppercase
lowercase

<p style="text-transform: uppercase;">Sample Text</p>

Output:


white-space

Used for controlling white spaces

Possible Values:
normal
pre
nowrap

<p style="white-space: pre;">
Sample Text
Sample Text Sample
Text Sample Text Sample Text</p>

Output:


word-spacing

Used to control the spacing between words

Possible Values: normal length

<p style="word-spacing: 10px;">Sample Text Sample Text</p>

Output:


e diel, 17 qershor 2007

CSS Implementations: Inline Style, Embedded Style, Linked Style, Imported Style and CSS Inheritance

* The css and html files used in this tutorial can be
downloaded here --> css_implementation.zip

Inline Style

Inline style is put directly into the opening tag of the html element that it is applied to. So it only controls the style of that single element.

Here, we’re going to have an inline style for an h1.

<h1 style=”font-size: 14px; color: red;”>CSS Tutorial</h1>

Embedded Style

Embedded Style is for styling multiple elements just within the html document. Embedded styles are defined and placed in the <head></head> portion of an html document and enclosed with <style></style> tags. Then, we have to put a style type=”text/css” to let the browser know what’s gonna go between the style tags.

embedded.html
---------------------------------------------------------------------------------
<ht
ml>
<head>

<title>Embedded Style&lt;/title>
<style type="text/css">
#content { width: 350px; border: 2px solid #000; padding: 10px;}
h1 { font: bold 12px Arial; color: blue;}
p.justified { text-indent: 25px; text-align: justify; color: red; }
p.left-aligned { text-align: left; color: green; }
</style>
</hea
d>

<body>
<div id="content">
<h1>Embedd
ed Style</h1>
<p class="justified">
This evening's guests were all European and all equally convinced that immigration was at the root of Europe's problems. Charles de Gruse said nothing. He had always concealed his contempt for such ideas.
</p>

<p class="left-aligned">
This evening's guests were all European and all equally convinced that immigration was at the root of Europe's problems. Charles de Gruse said nothing. He had always concealed his contempt for such ideas.
</p>
</div>
</body>
</html>

Output: embedded.html preview in Firefox
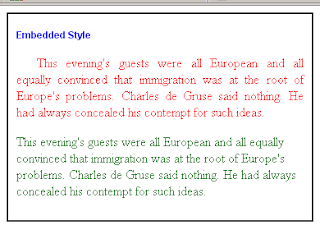


Embedded styles may take up more lines as you define more styles and may cause your page to load slower. It may be useful when you want to test a few styles to some pages but using it for multiple pages of your site is not that advisable.

Linked Style

With linked style, we define all needed styles in separate style sheets or .css files. Then link them up to the page where you want to apply the .css file to. So whenever you made changes in the .css file, it will be applied to all pages that is linked to that .css file.

The link goes in the head portion of the document. It uses the link element with three attributes: the rel attribute that states the relationship of the link as a style sheet, the type of information which is “text/css” and the href attribute to specify the source of the css file.

<head>
<link rel=”stylesheet” type=”text/css” href=”style.css” >
</head>

Here we used the same defined styles in our embedded style example but we placed it in a separate .css file and linked it into an html. In dreamweaver, you can just go to menu > file > new > css then copy and paste the styles in our embedded style example without the <style> tags and save it in the folder “style” and give it a filename of “linked-style.css”.

linked-style.css
---------------------------------------------------------------------------------
#content { width: 350px; border: 2px solid #000; padding: 10px; }
h1 { font: bold 12px Arial; color: blue; }
p.justified { text-indent: 25px; text-align: justify; color: red; }
p.left-aligned { text-align: left; color: green; }

linked.html
-----------------------------------------------------------------------------------
<html>
<head>
<title>Linked Style</title>
<link rel="stylesheet" type="text/css" href="style/linked-style.css">
</head>
<body>
<div id="content">
<h1>Linked Style</h1>
<p class="justified">
This evening's guests were all European and all equally convinced that immigration was at the root of Europe's problems. Charles de Gruse said nothing. He had always concealed his contempt for such ideas.
</p>
<p class="left-aligned">
This evening's guests were all European and all equally convinced that immigration was at the root of Europe's problems. Charles de Gruse said nothing. He had always concealed his contempt for such ideas.
</p>
</div>
</body>
</html>

Output: linked.html preview in firefox.
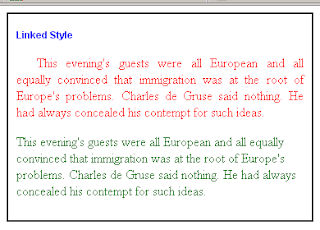


Still, the output is the same as our embeded style example, but we’ve shortened our code by just linking the styles from a .css file.

When the browser picks up a linked style, it will be cached in the browser. So, all of the style information is already loaded in the browser which results to faster rendering of your designs.

Imported Style

You can import a css file into a document by using the syntax of an embedded style. It works like a linked style but now you can also import other css files within that imported css file. We use the keyword “@import” with url(“<directory path here>”) to specify the source of your css file.

<style type="text/css">
@import url(“style/mycssfile.css”)
</style>

When you’re renovating your site and needed to apply or link an additional css file, you can just directly import that new css file within the old css file that you already imported into your pages. Therefore, you do not have to edit each of your html docs and add a new css link.

Some designers have the practice of separating the layout styles from the design styles and we can do that by importing css files.

imported-style.css /*contains the layout styles*/
---------------------------------------------------------------------------------
div#left-div
{
float: left;
width: 150px;
border: 2px solid #000;
padding: 10px;
}

div#right-div
{
float: left;
margin-left: 25px;
width: 150px;
border: 2px solid #000;
padding: 10px;
}

imported.html
---------------------------------------------------------------------------------
<html>
<head>
<title>Imported Style</title>
<style type="text/css">
@import url("style/imported-style.css");
</style>
</head>

<body>
<div id="left-div">
<p class="justified">
This evening's guests were all European and all equally convinced that immigration was at the root of Europe's problems. Charles de Gruse said nothing. He had always concealed his contempt for such ideas.
</p>
</div>
<div id="right-div">
<p class="left-aligned">This evening's guests were all European and all equally convinced that immigration was at the root of Europe's problems. Charles de Gruse said nothing. He had always concealed his contempt for such ideas.
</p>
</div>
</body>
</html>

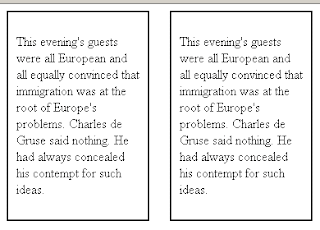
Output: imported.html preview in Firefox before we import the styles for the design.


imported-style2.css /* contains the designing styles */
---------------------------------------------------------------------------------
p.justified { text-indent: 25px; text-align: justify; color: red; }
p.left-aligned { text-align: left; color: green; }


Now, we’re going to import “imported-style2.css” in "imported-style.css". When you import css files into another css file, make sure to place it on top or at the beginning of the document.
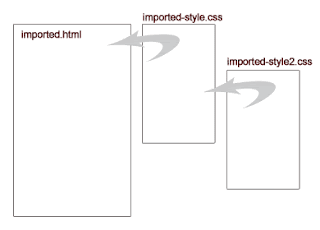


Our new imported-style.css will now look like the code below.


imported-style.css
---------------------------------------------------------------------------------
@import url("imported-style2.css");

div#left-div
{
float: left;
width: 150px;
border: 2px solid #000;
padding: 10px;
}

div#right-div
{
float: left;
margin-left: 25px;
width: 150px;
border: 2px solid #000;
padding: 10px;
}

Output: After we’ve imported “imported-style2.css”, imported.html will now look like this. (firefox preview)
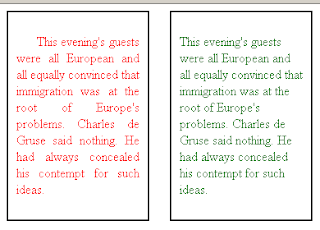


There is no limit to how many css files you can import into another css file so adding up new css stylesheets won’t be that troublesome.

CSS Inheritance or Hierarchy

A general rule: The style that is closest to the content will be the one applied.

Inline styles override the embedded and linked styles. It has a higher precedence and considered more specific. Embedded styles also override linked styles.

Inline > Embedded > Linked

For example, in linked style, both css files below have defined an h1 with the same attributes but with different color values. Since the linked-style2.css
in linked.html is positioned closest to the content, it will override linked-style.css’ color value.

linked-style.css
---------------------------------------------------------------------------------
#content { width: 350px; border: 2px solid #000; padding: 10px;}
h1 { font: bold 12px Arial; color: #330099;}
p.justified { text-indent: 25px; text-align: justify; color: red; }
p.left-aligned { text-align: left; color: green; }

linked-style2.css
---------------------------------------------------------------------------------
h1 { font: bold 12px Arial; color: red;}

linked.html /*head portion of linked.html in our linked style example*/
---------------------------------------------------------------------------------
<head>
<link rel="stylesheet" type="text/css" href="style/linked-style.css">
<link rel="stylesheet" type="text/css" href="style/linked-style2.css">
</head>

Based on our previous example linked.html, we linked another css file linked-style2.css. When <h1>Linked Style</h1> is displayed, it will take the color value of red instead of blue in linked-style.css because <link rel="stylesheet" type="text/css" href="style/linked-style2.css"> is the one closest to the content.

Output: linked.html preview in Firefox
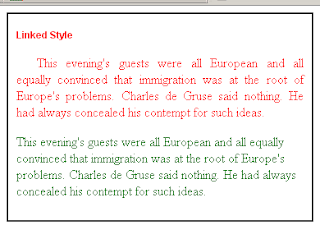


Another example…
inherited.css
---------------------------------------------------------------------------------
#content{ width: 350px; border: 2px solid #000; padding: 10px;}

p{ color: blue;}

inheritance.html
---------------------------------------------------------------------------------
<html>
<head>
<title>Inheritance</title>
<link rel="stylesheet" type="text/css" href="style/inherited.css">
<style type="text/css">
p.justified { text-indent: 25px; text-align: justify; color: red; }
</style>
</head>

<body>
<div id="content">
<p class="justified">
This evening's guests were all European and all equally <span style=" "> convinced </span>that immigration was at the root of Europe's problems. Charles de Gruse said nothing. He had always concealed his contempt for such ideas.
</p>
<p>
This evening's guests were all European and all equally convinced that immigration was at the root of Europe's problems. Charles de Gruse said nothing. He had always concealed his contempt for such ideas.
</p>
</div>
</body>
</html>

Output: inheritance.html preview in firefox
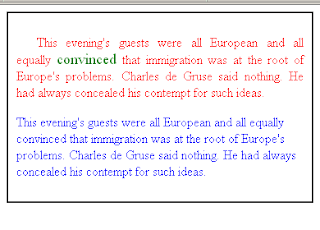


As you can see, the embedded style class “justified” is applied in the first paragraph but the word “convinced” was enclosed with <span> tags with inline styles and override the color red into green. The second paragraph doesn’t have an inline, class or id styles applied into it so it still inherits the defined style for <p> in the external css file “inherited.css” which turned the paragraph into blue.

e mërkurë, 13 qershor 2007

CSS Class and ID Selector

CSS Class Selector

You define a class selector when you want to set different properties on the same html element.
For instance, you want to define a paragraph with a font size of 12px and another paragraph with a font size of 10px. You can do so by defining separate classes of p.

p.paragraph1 { font-size: 12px }
p.paragraph2 { font-size: 10px; color: red; }

Then you can apply it to using the class property of your paragraphs in your html code.

<p class="paragraph1"> paragraph 1 </p>
<p class="paragraph2"> paragraph 2 </p>

You may also define a class independently and use it to any html element that applies to the defined properties. A class selector starts with a dot (.) and name it whatever you want. But it’s better if to name it descriptively.

.normaltext { color: #221133; font-size: 12px; }

It may be applied to the following:

<div class="
normaltext">content here </div>

<p class="
normaltext">paragraph here</p>

<p>

my <span class="normaltext">css</span> sample text

</p>

A good thing about classes is that you can use it several times in your pages and you won’t have to define redundant styles for html elements.

Note: In naming your classes, don’t begin it with a number coz it won’t work in Mozilla/Firefox browsers.

CSS ID Selector

The ID selector works like a class selector. But instead of a dot (.), it uses a sharp # sign. The only difference is, you can only use a defined id once in a single html file.

#page-container { width: 600px; margin: 0px; color: #442122; }

It can also be preceded by a tag to specify the html element to where the id selector will be applied.

div#page-container { width: 600px; padding: 0px; color: #442122; }

Use the “id” property of an html element to apply the defined id.

<div id=”page-container">
---your content here ---
</div>


e martë, 12 qershor 2007

CSS Syntax

selector { property: value }

CSS syntax is simply composed of three parts: a selector, a property and a value.

p { color: #221133 }

The selector is mainly an html tag or element you like to style like the selector “p” for paragraphs. The property is an attribute of the html element that contains a specific value. An html element has one or more properties and are enclosed in curly braces {}. When using two or more properties, separate each with a semicolon.

p { color: #221133; font-size: 12px;}

if value contains two or more words, place quotes around the value.

p { font-family: “Times New Roman” }

If you wish to apply similar properties for different selectors, you may do so by grouping the selectors and separate each with a comma.

p, h1, h2, h3, body { color: #221133; font-size: 12px;}

You may type in your CSS code in any way you want as long as the syntax is correct. White spaces don’t count. You can define all properties in single line or define a property on each line and put indentions for readability.

p, h1, h2, h3, body {
color: #221133;
font-size: 12px;
}

CSS Comments

You can place comments on your css code by enclosing them with /* */. Comments are very useful for explaining and describing your css code. It may serve as a guide to others viewing your code and also for you when viewing it on later dates.

/* For Home Page paragraphs and headers */
p, h1, h2, h3 {
color: #221133;
font-size: 12px;
}

What is CSS?

CSS stands for Cascading Style Sheets. Developed in 1997, CSS has been a powerful tool for designing and layouting web pages. CSS allows you to completely separate the contents of your site from the styles that tell browsers how to display an HTML page. Compared to using HTML alone, CSS offers more flexibility and control in applying style properties to different HTML, XHTML and XML elements. Because of it’s widespread use, modern browsers support all levels of CSS: CSS1, CSS2 and CSS3.

Benefits of using CSS

  • A single style sheet may be applied to all pages of your website. Therefore, making changes such as changing a new font color can be done only once in the style sheet alone. You won’t have go through a lot of trouble changing the font color in every page of your website.
  • Using CSS makes your web pages load faster into browsers. A style sheet is only downloaded once into your computer. Then, it’s called up from a local cache, resulting in smaller HTML pages.
  • Working with CSS allows a designer to separate its code from a programmer’s HTML or script code. A designer can easily work on a website’s style and layout through an external CSS style sheet and avoid the hassles of going through the programmer’s code when manipulating style attributes.